XTRAN Example — Generate HTML Table of Images
Scenario — you have a directory full of graphic images, and you need a way to see what they look like in a convenient form. What you would like is an HTML page showing them, with their file names; then you can just point your favorite browser at it.
XTRAN to the rescue!
This example uses a set of XTRAN rules (meta-code) that reads image file names (one per line) from a text file, and generates an HTML table to show the images with their file names. It picks up its input and output file names, a title, and the table's number of columns from environment variables. In this case, we specified 5 columns in the table; for demonstration purposes, we used an input file that repeatedly names two image files.
The rules for this example comprise 42 code lines of meta-code, and took less than one hour to create, refine, and debug. (That's right, less than an hour!)
How can such powerful and generalized HTML generation be automated in less than an hour and only 42 lines of XTRAN rules? Because there is so much capability already available as part of XTRAN's rules language. These rules take advantage of the following functionality:
- Text file input and output
- Text manipulation
- Text formatting
- Environment variable manipulation
The following is an English paraphrase of the XTRAN rules used for this example:
    Open input file named by environment variable
    Create output file named by environment variable
    Fetch table's title and number of columns from environment variables
    Start HTML table
    For each image file name read from input file
        If table row already completed
            End table row, start next one
        Add table entry with image reference and file name
    End last table row, finalize table
    Close input and output files
NOTE that the HTML shown as XTRAN's output below was done with default conditions; XTRAN provides many options for controlling the way it renders code for output.
Process Flowchart
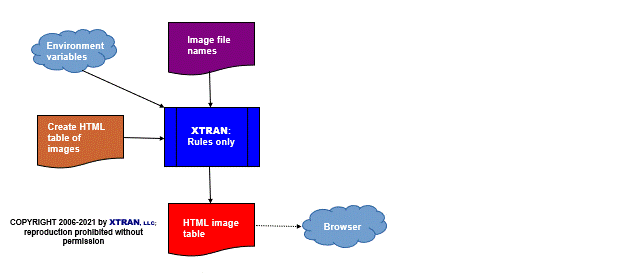
Here is a flowchart for this process, in which the elements are color coded:
- BLUE for XTRAN versions (runnable programs)
- ORANGE for XTRAN rules (text files)
- RED for
code - PURPLE for text data files

Input file — image file names:
images/new.gif
images/updated.gif
images/new.gif
images/updated.gif
images/new.gif
images/updated.gif
images/new.gif
images/new.gif
images/updated.gif
Output (rendered HTML):
"New" and "Updated" Animated GIFs
 new.gif |
 updated.gif |
 new.gif |
 updated.gif |
 new.gif |
 updated.gif |
 new.gif |
 new.gif |
 updated.gif |
Output (HTML text):
<html> <title>"New" and "Updated" Animated GIFs</title> <div> <h2 align="center"><font face="Arial">"New" and "Updated" Animated GIFs</font></h2> <table border="1" cellspacing="1" cellpadding="1"> <tr> <td align="center"><img src="images/new.gif" /><br />new.gif</td> <td align="center"><img src="images/updated.gif" /><br />updated.gif</td> <td align="center"><img src="images/new.gif" /><br />new.gif</td> <td align="center"><img src="images/updated.gif" /><br />updated.gif</td> <td align="center"><img src="images/new.gif" /><br />new.gif</td> </tr> <tr> <td align="center"><img src="images/updated.gif" /><br />updated.gif</td> <td align="center"><img src="images/new.gif" /><br />new.gif</td> <td align="center"><img src="images/new.gif" /><br />new.gif</td> <td align="center"><img src="images/updated.gif" /><br />updated.gif</td> </tr> </table> </div> </html>